Thursday 29 December 2011

Your tastiest treats of 2011!

We are still recovering from the sugar overload at my parents house at the moment...between my sister and I we have been baking up tasty treats daily for all our family! My sister Mel may not be lucky enough to receive any of the treats going forward after the hair dying disaster she was involved in tonight - moral of the story: never let your sister dye your hair, no matter how much money it will save it won't be worth it! 


As a result, I'm feeling sorry for myself so...


Let's take a look back at the recipes you enjoyed the most this year: as it's bound to cheer me up!

10. The London Cheesecake


I suspect the popularity of this post was down to the rarity of these treats. They are pretty hard to come by in shops and bakeries over here in England and so many of you are probably having to resort to making them yourself.  It's a pretty easy recipe with ready rolled puff pastry but for a quick and delicious treat it's a winner.

9. Red Velvet & Brownie Cupcakes


This was my first venture into red velvet cupcakes, I balanced it out by baking my fail safe and most loved Martha Stewart brownie cupcakes too.  They were for my friends wedding in the summer and the red, white and heart theme tied in well with the whole day.

8. Peppermint Crisp Fridge Tart


I am not proud of these pictures! Why would I leave the tart in the foil for the photo? Clearly I was too excited to eat these to worry about decent photography! but you didn't seem to mind! I'm guessing alot of you fellow South Africans were the bloggers upping the views on this post since peppermint crisps are a traditional South African chocolate bar.

7. Chocolate & Peanut Butter M&M Layer Cake


I'm surprised at this one! It was the first time I have ever used a box mix to make a cake! and I wasn't proud, I just prefer making everything from scratch.  I definitely think the benefit of a more superior and delish taste makes all the effort worth it! However I was low on time to bake this for my brother in law so Betty Crocker came to the rescue, but the recipe for this from scratch peanut butter frosting must have been what attracted you all - and for good reason, if you like peanut butter you will LOVE this frosting! 

6. Key Lime Pie Cupcakes


These need no explanation! zested lime cupcakes, filled with a homemade lime curd and topped with a meringue frosting (and my first foray into using a blow torch!) These went down an absolute treat for my Key Lime Pie loving mom's birthday.

5. Cadbury's Crunchie Cupcakes


For my Crunchie loving sister, I wanted a very 'Crunchie' cupcake.  I wanted more than just a piece of Crunchie on top...so I made a chocolate sponge filled with chopped up honeycomb pieces and Dairy Milk Frosting to tie the cupcake in with the chocolate bar.  They were a hit!   

4. Mini Baked Vanilla & Choc Fudge Oreo Cheesecakes


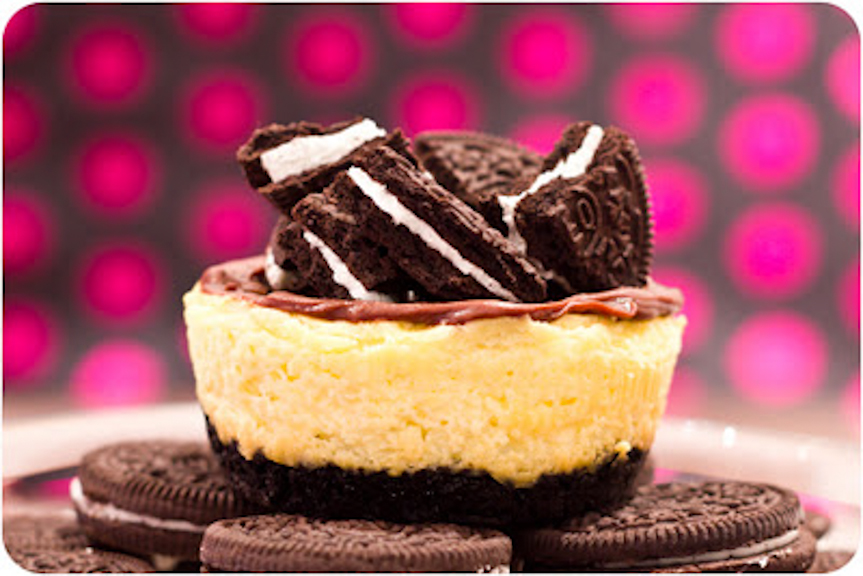
My first cheesecakes I made for the blog, which is a bit shocking considering how many hundreds I made with my job over the summer! One thing I do know is that you followers love a good Oreo cookie so pair them with some chocolate fudge and vanilla baked cheesecakes and an Oreo crust and you're talking one yummy dish! 

3. Cookie Dough Cupcakes


Who wouldn't love a choc chip studded sponge filled with a whole ball of raw cookie dough, topped with brown sugar frosting, some chocolate chips and a homemade mini cookie! They may sound a bit labour intensive with four different components...but they are worth every second invested in them! Hands down, some of the best cupcakes I have ever baked, and the many taste testers of these agreed too! 

2. Double Stuff Oreo Brownie Cupcakes


So I know you all love Oreos so a double stuff brownie cupcake was always going to draw a serious amount of attention! but I wasn't actually too happy with these because I made a rookie error (I made these in our first few weeks of living in the Caribbean) of leaving the cream cheese frosting out the fridge for the short time before I as making the frosting.  Of course the Turks and Caicos heat made the cream cheese far too soft and my frosting never recovered, so it wasn't stiff enough to pipe!! You didn't seem to mind, or perhaps you just couldn't get enough of that turquoise backdrop? 

1. The Smarties & Kit Kat Double Layer Chocolate Cake


By far your favourite post of 2011 was this cake, which came as a bit of a surprise.  Not because it's not delicious, because it definitely is! but because this cake has been around the block, there are tons of replicas of it on google or cakes in similar styles with different coloured m&m's or smarties so it's by no mean original! but it is a very simple cake to put together whilst looking impressive at the same time! so if you're ever in need of a show stopping cake that tastes the part too then look no further!

Hope you enjoyed the trip down memory lane!
I'm hoping we could turn back the clock 1 day so in the morning I wake up with a head of hair that is not ginger but unfortunately I don't think that's going to happen!

Thanks for all the blog loving you've given me this year and for all the new friends I've made and the tasty treats you continue to fill my google reader with!

Here's to lots more yummy blogs in the future! 

Saturday 24 December 2011

A Mad Hatters Afternoon Tea at The Sanderson Hotel, London

Mara and I spent a festive day of fun in London on Wednesday.
We went to all our favourite spots, checked out the Christmas lights, had a few cupcakes along the way, shopped up a storm...and had the most wonderful Afternoon Tea! 

Mara had booked it as a surprise.  She had told me I would have to be brave as it was going to be slightly experimental, I'm a bit of a fussy eater so I was getting slightly worried...

but I needn't have worried because we had the most delicious feast that wasn't remotely scary (apart from the salmon sandwich for a non fish fan like myself)! 


The Sanderson is a lavish boutique 5* hotel, and if you want to spend the night here it will typically set you back about £500! As we walked through the doors we were surrounded by fabric draping all the walls and there were quite a few cool seating areas in the foyer that we thought we'd test out! like these giant lips...


and this hanging pod! 


Afterwards we were whisked through into the beautiful courtyard garden where our experience really began! 


Here's a closer look at the menu, the rainbow coloured finger sandwiches sounded pretty inventive! 


and all the little treats had been designed with Alice in Wonderland in mind.


We started off with some non alcholic cocktails - lychee lemonade for me...


and a cranberry and strawberry concoction for Mar.  They were seriously tasty.


Next up, the rainbow platter arrived! and despite my earlier worries about how tasty spinach bread would be, you couldn't actually taste the flavourings they were just used to change the colour.  The turkey and cranberry sandwich went down particularly well, especially due to the festive nature of it! 


This was the platter in all it's glory! I love the little teacup at the top! That housed our praline ice cream pops covered in chocolate and popping candy! and the blueberry lollipop that was side coated in sugar.  We were instructed to hold the sugar side of the lolly on our tongue for 1 minute and then when we switched sides you felt a difference between hot and cold - it was quite cool (literally) and very yummy too! 


After that we delved into all the other sugary treats...


like this cute little chocolate cup that was filled with lime and ginger sorbet.  I didn't quite eat mine quick enough and some had melted at the bottom so I was able to sip it up from my edible cup! 


This 'Eat me' heart was a strawberries and cream mousse covered in white chocolate


and the mince pie with cinnamon cream cheese frosting was the only thing I passed on as I'm not a mince pie lover...but Mara said it was delish especially with the frosting addition of frosting.


I think our hands down favourite of the day was this tiny little bottle which was a trio of desserts! We were instructed to take it in 3 sips.  On the first sip you tasted some passionfruit jelly, on the next sip some gorgeously silky coconut panacotta and on the last sip some exotic foam! It was very inventive! 


 We rounded our afternoon off with some peppermint tea, served in these lovely iron teapots...


accompanied by our mini scones with jam and clotted cream.


It was an absolute feast, and we had so much fun trying everything out.  I would definitely recommend it out there as one of the more original Afternoon Tea's in London! 

Thanks to my super generous sister to treating me to it! 

and on this Christmas Eve here's wishing all my followers a very happy, and yummy, Christmas! May Santa be good to you this year! 

Saturday 17 December 2011

Christmas Mint Oreo Truffles coated with Mint Aero Chocolate


I know, I know - Oreo Truffles? you've heard it all before! These have been around the blogging world for about as long as I can remember...

but they are a timeless classic and delicious enough to be mentioned again! 

Everyone knows I am a fan of the Mint Oreo and especially because it's nearly Christmas I thought it was more than appropriate to make some Mint Oreo Truffles to take to our Relief Society Christmas social at church.

I even coated them in Mint Aero chocolate just for fun, but I made sure I used half regular chocolate and half Mint Aero because despite the past 3 days featuring minty treats I do know where to draw the line when it comes to mint! 

So, for those of you who are new to the Oreo Truffle - only 3 ingredients are required: Oreos, Cream Cheese and Chocolate! So what are you waiting for?

They are the perfect party treat! 


Mint Oreo Truffles:
Makes about 30 (depending on how large you want them)
Adapted from Bakerella

450g Mint Oreo cookies 
225g Cream cheese
200g Mint Aero chocolate
200g Milk chocolate
Sprinkles and sanding sugars to decorate

Finely crush the Oreo cookies in a food processor or in a ziploc bag with a rolling pin.
Stir in softened cream cheese. Use the back of a large spoon to help mash the two together completely.
Roll the mixture into 1″ balls and place on wax paper covered baking tray.
Place covered in the freezer for 30 minutes to help them retain shape when dipping in melted chocolate.
Melt chocolate in a double boiler or in 30 second intervals in the microwave.
Dip balls into chocolate (I use a teaspoon) tap off extra and set aside on wax paper covered cookie sheet to dry.
Sprinkle with green and red sanding sugar and festive Christmas tree sprinkles. Make sure to sprinkle the decorations on one at a time after each truffle has been dipped, if you try to do a few at a time the chocolate will set before you get the chance to stick them on.
Refrigerate for 30 minutes and then enjoy!

Christmas Mint Choc Chip Brownies


I have dreamed about the day when a bag of these babies would make their way into my possession, I kid you not! 

For years I have been left envying the many many blogs who would use them freely in their baking, longing for the day when I would be one of those bloggers!

So they finally came through my letterbox at the end of November thanks to The Stateside Candy Co.  The wait was over...but I knew I needed to make something really spectacular to do them justice! When I've seen them around in the past, it has usually been in double chocolate cookies with their green faces peeping through.  Cookies weren't going to cut it.  I decided brownies would be kind of standard too...

until I came across this brownie for inspiration and I knew what I had to do! 

So I began baking using this new brownie recipe, because trying out new brownie recipes never gets old for me.  This one was really moist and fudgy, just what I was hoping for.  I threw in the green mint baking chips at this stage.

Then, I whipped up a mint choc chip buttercream which really tasted like melted mint chop ice cream - you have got to try it!

The icing on the brownie was a layer of melted chocolate, and then I couldn't resist drizzling with that neon green chocolate, and adding a few Christmas tree sprinkles since I baked these brownies to aid us in putting up our Christmas tree on December 1st! 


Mint Choc Chip Brownies:
Makes 12

For the brownie layer:

1 cup butter

2 cups caster sugar

4 eggs

2 tsp vanilla extract
1 cup plain flour
½ cup cocoa powder
½ teaspoon salt
230g mint baking chips


Preheat oven to 180 degrees C. 
Line a 9 x 13-inch pan with foil and lightly grease with cooking spray. Set aside.
In a medium bowl, combine the flour, cocoa, and salt. Set aside.
In a medium saucepan over low heat, melt the butter. Remove from the heat and add the sugar, stirring well to combine. Whisk in the vanilla and then the eggs. Blend well.
Add the dry ingredients to the wet ingredients and mix well. 
Throw the mint chips in a bowl with some flour, make sure they are coated (this will ensure even distribution).
Gently stir in the mint baking chips. 
Pour into the prepared pan and bake for 32-35 minutes, until the brownies are set in the middle but not over baked.  You want some moist crumbs still remaining when you insert a knife. Let cool completely.

For the frosting layer:

1/2 cup unsalted butter, softened
1/2 tsp vanilla extract
1/2 tsp peppermint extract
2 1/2 cups icing sugar
2 tbsp semi-skimmed milk
1/2 cup plain chocolate, chopped coarsely
a few drops of green food colouring

While the brownie is cooling make the frosting. 
Using an electric mixer, cream together the butter, vanilla and peppermint extract.
Add in the icing sugar one cup at a time, and then add in the milk, one tablespoon at a time until frosting is smooth and desired consistency has been reached.  It will be quite a soft frosting (not one that could be piped).
Stir in the food colouring (if desired) and then fold in the chocolate chips.

For the chocolate layer:

2 cups milk chocolate chips
1 tbsp vegetable oil

In a small bowl, combine 2 cups of chocolate chips with 1 tablespoon of oil.  
Melt in microwave in 30 second intervals, or over a double boiler.

To Assemble:

Spread a generous layer of mint choc chip frosting over the cooled brownie with a palette knife.  Try and ensure it is as even as possible.  This will help with the overall presentation.
Once the melted chocolate has cooled for a minute pour it over the frosting layer.  
Melt some of the green baking chips in a small bowl and drizzle over the chocolate layer.
Sprinkle with Christmas tree edibles and put in the fridge for the chocolate layer to harden.
Once it is hard, cut into squares and serve.

I am fully aware that over 50% of the brownies I have baked on this blog involve mint...occasionally double mint and sometimes even triple mint so maybe the mint brownie thing is getting old, but really can mint paired with chocolate and baked in a brownie ever get old? Not for me it can't! 

Friday 16 December 2011

Christmas Brownies with Mint Chocolate Swiss Meringue Buttercream


These are the final treats I baked for my Christmas Stall last week.  The brownies were super moist and the light and fluffy swiss meringue buttercream was the perfect partner.  The crushed candy canes brought out the hint of mint in the frosting and the mint drizzle added flavour and festive-ness! 

Brownies:
Makes 12 

225g milk chocolate
1/2 cup unsalted butter (at room temperature)
1 cup caster sugar
3/4 teaspoon salt
3 large eggs
1/2 cup plain flour
1/4 cup sifted cocoa powder

Preheat oven to 180 degrees C.  
Place chocolate and butter in a heatproof bowl set over a pan of simmering water.  Stir occasionally until just melted, about 4-5 mins.
Remove bowl from heat.  Whisk in sugar and salt until mixture is smooth, whisk in eggs to combine.  Gently whisk in flour and cocoa just until smooth (do not overmix).
Fill a pre greased brownie pan.  Bake, until a knife inserted halfway into the middle comes out with only a few moist crumbs attached, for about 20-25 minutes.


Mint Chocolate Swiss Meringue Buttercream:
Makes enough to frost the above plus extra to eat!

5 large egg whites
250g caster sugar
pinch of salt
450g unsalted butter
1 tsp peppermint extract
130g plain baking chocolate

Combine egg whites, sugar and salt in the heatproof bowl of a standing mixer set over a pan of simmering water.
Whisk constantly by hand until mixture is warm to the touch and sugar has dissolved.
Attach the bowl to the mixer fitted with the whisk attachment.  Starting on low, gradually increase to medium-high and whisk until stiff (but not dry) peaks form.  Continue mixing until the mixture is fluffy and glossy and completely cool (test by touching the bottom of the bowl) about 10 minutes.
Add the butter a few tablespoons at a time, mixing well after each addition.  Once all butter has been added, whisk in peppermint extract and melted chocolate.
Switch to the paddle attachment and continue beating on low speed until all air bubbles are eliminated, about 2 minutes.
Scrape down sides of bowl with a flexible spatula, and continue beating until the frosting is completely smooth. 


To Assemble:

3 candy canes
Mint baking chips, melted

Once brownies have cooled, frost with a generous layer of mint chocolate swiss meringue buttercream.
Put candy canes in a zip loc bag and crush with a rolling pin.
Sprinkle over the frosting.
Melt mint baking chips (or white chocolate tinted with green colour) and drizzle over the top.

Christmas Gingerbread Cupcakes with Cream Cheese Frosting and Gingerbread Men Toppers


The final cupcakes I made for the Christmas stall were gingerbread flavour.  
There's just something about gingerbread, and to me you can't do Christmas baking without it featuring! 
The simplicity of the cream cheese frosting is the perfect combo with the spiciness of the cupcake, and what makes them super cute is the mini homemade gingerbread man on top.

Gingerbread Cupcakes:
Makes 12 regular and 12 mini

1 cup self raising flour
1 cup plain flour
1/2 tsp bicarbonate of soda
2 tsp ground ginger
1 tsp ground cinnamon
1/2 tsp ground nutmeg
1 cup dark brown sugar
2 eggs
180g unsalted butter, softened
1/2 cup semi-skimmed milk
4 tbsp golden syrup 

Preheat oven to 170 degrees C.
Sift flour, bicarbonate of soda, ginger, cinnamon and nutmeg into the bowl of a free standing mixer.
Add the remaining ingredients.
Beat in mixer until combined and lighter in colour (approx. 2 mins).
Divide mixture between cases.
Bake for 30 minutes.
Leave to cool in pans for 10 minutes and then transfer to a wire rack.

Cream Cheese Frosting:
Makes enough to frost above

300g icing sugar
50g unsalted butter, at room temperature
125 cream cheese, cold

Beat the icing sugar and butter together in a freestanding electric mixer with a paddle attachment on medium slow speed until the mixture comes together and is well mixed.
Add the cream cheese in one go and beat until it is completely incorporated.
Turn the mixer up to medium-high speed.
Continue beating until the frosting is light and fluffy, at least 5 minutes.
Do not overbeat, as it can quickly become runny.

Gingerbread Men Cookies:
Makes approx. 30-40 cookies depending on size or 12 large size gingerbread men
From: Net Mums

350g plain flour
1 1/2 tsp ground ginger
1 tsp bicarbonate of soda
100g unsalted butter
175g soft light brown sugar
1 egg
4 tbsp golden syrup

Sift the flour, ginger and bicarbonate of soda into a bowl.
Rub in the butter (or if you're lazy like me your KitchenAid can do this job pretty well too).
Add sugar and stir in the syrup and egg to make a firm dough.
Flour your work surface generously and flour the rolling pin, roll out to 5mm thick.
Flour your cookie cutter and cut out the men.
Space the cookies out on your baking sheet as they will spread out.
Bake at 190 degrees C for 10-15 minutes (Cut the baking time in half if you are making the mini size gingerbread men for cupcake toppers). 
Leave to firm up on the baking tray for 5 minutes and then transfer them to a wire track to cool.

Once I had made enough mini gingerbread men for the cupcakes, I used the rest of the dough to make different festive shaped cookies.  I whipped up a batch of very standard icing = icing sugar and water, and then piped an outline on the cookies, flooded the middle and decorated them with a variety of sprinkles.


For the mini versions of the cupcake I topped them with gingerbread men sprinkles which were very cute too as unfortunately they don't make a gingerbread man size cutter small enough to fit on top of a mini cupcake! I also used my gingerbread men cupcake cases, and you may just be able to see them peeking through if you look extra close in this pic! 


Each egg box of mini's contained the three other festive flavours too: Candy Cane Red Velvet, Peanut Butter Brownie and Hot Chocolate.

Wednesday 14 December 2011

Christmas Bauble Brownie Cupcakes with Peanut Butter Frosting


I was recently lucky enough to be able to order two different long coveted baking goods from The Stateside Candy Co.  One was some Guittard mint baking chips and the other was these awesome festive mini Reese's peanut butter cups (that's right my American readers - us deprived bakers in England cannot find either of those products on our supermarket shelves!) and I felt because it was Christmas I was more than justified to buy overpriced delights like these.

I also knew I wanted to create some bauble (Christmas ornament) cupcakes and that these Reese's cups would be the perfect decorating aid for the Christmas Market Stall these cupcakes made their debut at.

These were my favourite of the whole day.  The brownie and peanut butter combo is pretty unbeatable, but I also loved the fun decoration too.  They were rather time consuming, especially when I started off making the zig zag patterns out of individual jimmies.  I realised it was going to be an even longer night than expected if I carried on like that so I moved on to making a fairly easy row of sprinkles and sugar pearls in the middle of the bauble with some zig zag patterns being more easily formed by melted chocolate either side of them.

Brownie Cupcakes:
Makes 12 regular and 24 mini's

450g milk chocolate
1 cup unsalted butter (at room temperature)
2 cups caster sugar
1 1/2 teaspoon salt
6 large eggs
1 cup plain flour
1/2 cup sifted cocoa powder

Preheat oven to 180 degrees C.  
Place chocolate and butter in a heatproof bowl set over a pan of simmering water.  Stir occasionally until just melted, about 4-5 mins.
Remove bowl from heat.  Whisk in sugar and salt until mixture is smooth, whisk in eggs to combine.  Gently whisk in flour and cocoa just until smooth (do not overmix).
Fill cupcake cases until 3/4 full.  Bake, rotating tin halfway through, until a cake tester inserted halfway in centres, comes out with only a few moist crumbs attached about 25-30 minutes (and 12-15 minutes for the mini's).

Peanut Butter Frosting:
Makes enough to frost the above

4 cups icing Sugar
1/2 cup semi-skimmed milk
1/2 cup unsalted organic unsalted butter
1 cup smooth organic peanut butter
2 tsp vanilla

Blend together the sugar, milk, butter and peanut butter until smooth.  If you require a thicker consistency add more sugar, if you need it to be thinner add more milk. 


To Assemble:

Using an ice cream scoop, scoop up a level scoop of frosting and put it on top of the cupcake.
I used the back of a teaspoon to help smooth it out so that it covered the whole surface of the cake.  I tried to make sure I maintained a 'domed' shape with the mound of frosting.
Place a mini Reese's peanut butter cup at the top of the frosting.
Use sprinkles to create bauble type patterns on the frosting.
Melt some chocolate to pipe on zig zag patterns.

Tuesday 13 December 2011

Christmas Hot Chocolate Cupcakes with Swiss Meringue Buttercream


These hot chocolate cupcakes were so 'hot' they were flying off the stall faster than I could keep track of them.  I'm not sure whether it was because everyone liked the look of that chocolate covered wafer peeping out the top, or because it was a rather chilly day here in Wales and maybe it was just what people needed to warm up! 

Either way people 'oohed' and 'aahed' over them and one lady told me my cupcakes looked so perfect she didn't think they were real at first! 

What makes these hot chocolate cupcakes special is that they have a mug of real hot chocolate blended into the batter, and paired with swiss meringue buttercream they are a delightfully decadent festive treat! 

I know many people are terrified of making swiss meringue buttercream but I'm here to tell you that it is not scary at all.  As long as you follow all the steps carefully and keep going beyond the stage where it looks like it's going to curdle, you will end up with some of the silkiest frosting ever that is my favourite kind of piping to frost with because it just looks so glossy and awesome once you're done! 

Hot Chocolate Cupcakes:
Makes 12 Regular and 12 Mini's

310g plain flour
450g caster sugar
115g cocoa powder
2 tsp baking powder
1 tsp bicarbonate of soda
3 eggs
2 heaped tsp hot chocolate powder mixed with 180ml warm milk
3/4 cup vegetable oil
1 tsp vanilla extract

Preheat oven to 180 degrees C.
In a free standing mixer, combine all dry ingredients: flour, sugar, cocoa powder, baking powder, bicarbonate of soda and salt.
Add wet ingredients to dry ingredients: eggs, hot chocolate/milk mixture, vegetable oil and vanilla extract.
Beat on medium speed until well combined, scraping down sides of bowl as needed.
Fill cupcake cases 2/3 full with batter.
Bake for 16 minutes or until knife inserted in middle comes out clean.
Let cupcakes cool in pans for 10 minutes, then transfer to wire racks to finish cooling.

Swiss Meringue Buttercream:
Makes enough to frost the above

5 large egg whites
250g caster sugar
pinch of salt
450g unsalted butter
1 1/2 tsp vanilla extract

Combine egg whites, sugar and salt in the heatproof bowl of a standing mixer set over a pan of simmering water.
Whisk constantly by hand until mixture is warm to the touch and sugar has dissolved.
Attach the bowl to the mixer fitted with the whisk attachment.  Starting on low, gradually increase to medium-high and whisk until stiff (but not dry) peaks form.  Continue mixing until the mixture is fluffy and glossy and completely cool (test by touching the bottom of the bowl) about 10 minutes.
Add the butter a few tablespoons at a time, mixing well after each addition.  Once all butter has been added, whisk in vanilla.
Switch to the paddle attachment and continue beating on low speed until all air bubbles are eliminated, about 2 minutes.
Scrape down sides of bowl with a flexible spatula, and continue beating until the frosting is completely smooth. 


To assemble:

Pipe Swiss Meringue Buttercream onto the cupcakes using a narrow opening star nozzle to ensure that you get lovely ruffles to create the whipped cream effect.
Add 3 mini white marshmallows to the top of the frosting.
Lightly sprinkle some cocoa powder over the top using a sieve.
Stick your pre prepared wafer into the frosting at a diagonal angle.  (The night before I melted some milk chocolate and dipped the ends of all the wafers in the chocolate and left them to dry on a sheet of parchment paper, and then transferred them into an airtight container.)

Monday 12 December 2011

Christmas Candy Cane Cupcakes: Red Velvet with Peppermint Frosting


Welcome to my week long Christmas recipe event! I will be sharing all the yummy recipes that I baked for the Christmas Cupcake Stall I ran last week.

I'm still not a red velvet fan myself, but I know for whatever reason (is it just for the fact that they are red?) that they are a crowd pleaser and so I felt like no candy cane cupcake would be complete without a splash of red! and of course the obligatory two tone red and white frosting.  Traditionally, red velvet cupcakes are always paired with cream cheese frosting but just for something different I paired mine with peppermint frosting to match the candy cane flavour.

I've had a few people ask me how you create two tone frosting...it really is super easy.  You just need to fill two disposable piping bags with the separate colours and then put both piping bags inside a third piping bag with the nozzle attached.  I usually pipe out a small amount to start with before I pipe directly onto the cupcakes, because it takes a little while for the colours to blend properly.  If you're still not sure, there is a fantastic tutorial with photos to help here.

Red Velvet Cupcakes:
Makes 12 regular and 24 mini cupcakes

113g unsalted butter, at room temperature
335g caster sugar
2 large eggs
35g cocoa powder
6 tbsp red food colouring
1 tsp vanilla extract
242g buttermilk
280g plain flour
1 tsp salt
1 tsp bicarbonate of soda
3 teaspoons distilled white vinegar

Preheat oven to 180 degrees C.
On medium-high speed, cream the butter and sugar for 3 minutes until light and fluffy.  Turn the mixer to high and add the eggs.  Scrape down the bowl, and beat until well incorporated.
In a separate small bowl, mix together the cocoa powder, red food colouring and vanilla extract to make a thick paste.  Add to the batter and mix on medium speed until completely combined.  You may need to stop the mixer to scrape the bottom of the bowl to ensure all batter gets the colour.
Reduce the mixer speed to slow and add half the buttermilk, add half of the flour and mix until combined. Scrape the bowl and repeat with the remaining flour and buttermilk.  Beat on high until smooth.
Reduce the mixer to slow to add the salt, soda and vinegar.  Turn to high and beat for another few minutes until completely combined and smooth.
Divide the batter evenly between the cases and bake for 20 minutes, or until a knife inserted in the middle comes out clean.
Leave to cool in the pan for 10 minutes, and then place them on a cooling rack to cool completely before frosting.

Peppermint Frosting:
Makes enough to frost the above
From 'Cupcakes from The Primrose Bakery'

110g unsalted butter, at room temperature
60ml semi-skimmed milk, at room temperature
1/2 tsp good quality peppermint extract
500g icing sugar
Few drops of red food colouring (I used Red Extra)

In a free standing mixer, beat the butter, milk, peppermint extract and half the icing sugar until smooth - this can take up to 5 mins.  
Gradually add the remainder of the icing sugar and beat again until the buttercream is smooth and creamy.  
Taste the icing at this stage to see if you want to add more peppermint extract (if you are using standard mint extract that you get in a supermarket you may need to add slightly more than half a tsp).
Add a few drops of red colouring and beat thoroughly.  Check the colour, add more as needed.


To assemble:

Pipe a swirl of frosting onto each cupcake.
Use mini candy canes to decorate, or if only regular sized ones are available - cut them down to size with a very sharp knife (cutting a small amount off the bottom and off the top of the hook so they are in proportion).  This is what I did.
Sprinkle with red sanding sugar to finish off.

Saturday 10 December 2011

A Christmas Cupcake Stall at Bangor's Christmas Market


Yesterday was Bangor Uni's Christmas Market, which was run by the students.  We got an email a while back asking if anyone was interested in running a stall so I jumped at the chance, not realising the market was the day after I had an essay due in! In hindsight, it wasn't the best timing! but it turned out pretty well in the end considering how little sleep I got (please excuse the bad pictures - the lighting in the hall was terrible!) Also, I am not claiming responsibility for the purple tablecloth or the tinsel - that was all down to the University setting up! but I must thank my mom for sending me the awesome gold and starry tablecloth and serviettes to make my stall a little bit prettier! Most people didn't worry with their stalls but I like things to look fancy! 

Here's a little run down of everything I made, recipes will be following later in the week...


First up, I made some red velvet cupcakes with peppermint frosting.  I made the frosting two tone to co-ordinate with the candy cane toppers.  


The most popular of the day had to be these hot chocolate cupcakes with swiss meringue buttercream.  If you've never had swiss meringue buttercream before (no one seemed to know what it was who visited my stall!) it's a very silky light frosting made from a combination of heated egg whites, butter and sugar.  It's less sweet then regular buttercream and was the perfect accompaniment to the rich chocolate cupcake.  It also pipes on like a dream and as it's so light it helped to create the whipped cream look I was going for.  I dusted some cocoa, sprinkled some marshmallows on and dipped a wafer in melted chocolate just to finish them off! 


One of my favourite combos, especially for Christmas is gingerbread with cream cheese frosting.  I made these cupcakes for the first time two years ago and then last year in the Caribbean I made them with my sister too, so they're definitely becoming a bit of a tradition!


 Homemade gingerbread men as toppers always go down well.  I'm really not a fan of fondant decorations and I believe cupcake toppings should always look good and be delicious.


My favourite cupcakes of the day were these brownie cupcakes with peanut butter frosting.  They are all round a delicious flavour combo but also I was excited to make them so I could turn them into baubles! I ordered the mini Reese's peanut butter cups from one of my favourite websites - The Stateside Candy Co, and I knew as soon as I saw them that they would be perfect for looking like a bauble! 


So I tried my best to mound my frosting into a circular shape and then did a few zig zag patterns over the frosting with melted chocolate.  I put the reese's cup at the top to act as the hanging part of the bauble.  They were time consuming but I think they were worth the effort! As a random side note, I discovered last year whilst in the Caribbean from my American colleagues that they didn't know what a bauble was! Apparently in America they are known simply as Christmas Ornaments so for all my American followers these were my 'Christmas Ornament' cupcakes! 


I also baked 12 mini's of each flavour because these bite sized treats are always popular.


Did you know egg boxes are made for putting mini's in? I like to give them aways as presents in these by decorating the boxes and tying ribbon around them.  I decorated these with some striped Christmas paper and a gift tag...


and put a random assortment of mini's inside - people fell in love with these and all the boxes were snapped up in the first 20 minutes! I must remember to make more for next time around...


I finished with a few treats for those out there who might not be as cupcake crazy as I am! I made some Christmas shaped gingerbread cookies, and these peppermint brownies.  They were chocolate brownies frosted with chocolate-peppermint swiss meringue buttercream and finished off with some chopped up candy canes and a drizzle of mint chocolate .  I made these in the last hour before we had to leave the house as an afterthought, but I was glad I did as they got some of the best compliments of the day! 

I'm off to do my 25th load of washing up...no really! Baking for the masses without a dishwasher is no fun at all! 

LinkWithin

Related Posts with Thumbnails