Monday 31 December 2012

Your Tastiest Treats of 2012!

So 2012 is nearly over, and when you read this I will be ringing in the New Year at Whistler! I can't wait! That place has become like our second home this past month, and I couldn't be happier about that because truly it's one of the most beautiful places on Earth!

For now, let's take a trip down memory lane and see the posts which were your favourite this year!


This was probably my favourite of 2012 (and hopefully Byron's too, since I made it for his birthday!) It's probably the most decadent layer cake I've ever made, and it definitely took the most time but it was SO worth it.  Chocolate chip studded cake, sandwiched with chocolate fudge and raw cookie dough, surrounded in cookie dough flavour frosting and finished off with more cookies - this time baked ones! If you have any cookie lovers birthday's coming up, this is worth the effort!


You just can't get enough of the South African treats! and despite me having a mishap when removing the base of my springform tin and the side of the biscuit crust caving in it's still a hit! How can it not be when you combine creamy layers of caramel whipped with cream with layers of coconut biscuits and those crystal shards of minty-ness that comprise my favourite chocolate bar - Peppermint Crisps! and the good news is on the bus the other day I saw a South African shop has just opened on West 4th so now I can get my Peppermint Crisp fix in Vancouver too! 


I made these S'mores cupcakes for our New Year's eve party last year! Graham cracker flavour cupcakes, with marshmallow frosting and cubes of chocolate on top - they were devoured pretty quick! I haven't even had to bake a special treat for this New Year's since we have enough sweet treats left over from Christmas to see us through the next 2 weeks!!


If you only make these cupcakes to check out this 'to-die-for' frosting then it will be worth it.  This chocolate-malt frosting turned out to be my most favourite frosting of 2012, I could eat it by the spoonful...and I did! The malt flavour cupcakes are pretty special too, and to top it all off you just have to complete it with mini Malteser Bunnies (if you live in the UK...I'm pretty sure you won't find them elsewhere which is not good news for me...how will I get my fix come Easter!)


This was the first time I ever thought about combining peanut butter frosting with crushed up Oreo crumbs - it was a GOOD decision! Combined with my favourite chocolate cupcake recipe, these two made a fantastic pairing!


I made these for an Easter market stall I did.  I made several other flavours alongside these ones but I think these got the most 'oohs and aahs' from people passing by.  Not only does the frosting look like creme egg filling but it tastes exactly like it too!


These were a happy little accident that came about because I had loads of fresh pureed strawberry in the fridge just waiting to be used up! We took these to a summer BBQ at a friends house, it was pure blue skies with not a cloud in sight that day (a rarity in Wales!) and these tropical beauties fit right in! The addition of lime in the frosting gave these a totally tropical twist! 


This was a recipe my South African Mom whipped up one weekend, apparently it had been a staple dessert for her growing up.  Why she had been holding out on us for so long I don't know! because this was so creamy and fruity and it's definitely going to be a staple for the Braithwaite's too!


You just can't beat a good Oreo cupcake! Up until I made this, my favourite Oreo cupcake had been a chocolate version with chopped up bits of Oreo in the batter.  However after making this vanilla based Oreo cupcake I realised my chocolate version had been overpowering the Oreo bits...whereas this cupcake lets the Oreo flavour shine through! A new favourite! 


It pains me that the number 1 most visited recipe on my site this year was the post with the worst pictures!! It was one of those nights where I was rushing, as our dinner guests were waiting for dessert, and I didn't want them to think I was too weird by taking a million pictures of it and making them wait to eat it!! Then I discovered the batteries on the flashgun had run out...and so I had to make do with dark and not so attractive pictures! but I'm glad that didn't put you off because this is one of the most delicious desserts I have ever made.  We all know I love anything s'mores, but this creamy chocolate filling was out of this world and paired with a graham cracker base and a toasted marshmallow topping it is totally dreamy! Of course I'm pretty sure the popularity of this post also had to do with the fact I was doing a cheesecake giveaway too! but if there's one thing you need to make this year it is this cheesecake! and don't forget the chocolate-malt frosting too! They're both going to make you very popular indeed! 

 Thanks to everyone for following along this year, I LOVE when a little email or comment pops up from one of you - it makes my day! and thanks to all you other bloggers for keeping my google reader overflowing with delicious recipes and inspiration! 

Wishing all of you an awesome New Year's and a totally tasty 2013!

Friday 28 December 2012

Peppermint Bark Frosted Brownies


I have been baking like crazy this month! Not that you'd know it with the lack of blogging that's been going on around here! I have so many festive recipes still to blog...and I know Christmas is over but I can eat peppermint and chocolate any day of the week and you can always pin these for next year! 


I made some homemade peppermint bark for the first time ever! We don't get bark in England (aside from in Costco, which doesn't really count since it's American anyways!) so I've always been a fan of it! It's delicious to eat by itself or to use in recipes! Watch out for some peppermint bark cheesecake truffles that I'll be blogging soon too!


There was a Christmas dinner at my work and I signed up to bring desserts.  I made these super moist and fudgy brownies (the base brownie recipe is my new fave), slathered on some creamy chocolate frosting..


and finished with a sprinkling of chopped up homemade bark, and I also melted some candy cane peppermint kisses down to drizzle across the top tying the whole peppermint theme together! 

The principal at my school said they were the best brownies she had ever eaten, so I took that as a pretty good compliment!

Peppermint Bark Frosted Brownies:
Makes 16
From Cupcake Crazy Gem

4oz (110g) dark chocolate (70% cocoa solids)
1 stick (110g) unsalted butter
1/4 tsp salt
1 tsp vanilla extract
2 eggs
1 1/4 cups (250g) caster sugar
1/2 cup (65g) plain flour

For the frosting:

2 cups (500g) icing sugar
1 stick (110g) unsalted butter
1/2 cup dark/semi sweet chocolate chips, melted
2 tbsp semi skimmed milk

1 1/2 cups chopped up peppermint bark
1/3 cup candy cane peppermint kisses

In a heatproof bowl above a pan of simmering water, melt the chocolate and butter together.  Once completely melted, stir in the vanilla and salt.  Set aside to cool.
Preheat the oven to 400 degrees F and grease a brownie tin, I used a 9x9"dish.

Whisk the sugar into the cooled chocolate mixture, and add the eggs one at a time - beating well after each addition.  Stir in the flour using a metal spoon.

Pour into your pre prepared pan and bake for 20-22 minutes.  I always check mine around the 18 minute mark because you really don't want to over bake these.  Once out of the oven, immediately put the brownie pan into the freezer (make sure you put a tea towel underneath it first) and leave them to get nice and fudgy in there while you make the frosting.

Beat the butter and sugar together until creamy.  I usually add the sugar one cup at a time to avoid icing completely covering my kitchen.  Melt the chocolate chips in a bowl in the microwave in 30 second intervals.  Once cool, beat it into the frosting.  Add the milk and beat for 2 minutes until fluffy.

Once the frosting is finished, remove the brownies from the freezer and from the pan.  Using a palette knife, slather the brownie slab with the frosting.  Chop it into squares whilst still semi frozen as this gives you the neatest slices.  Add the chopped up peppermint bark and drizzle with candy cane kisses.

Serve and enjoy! 

Monday 17 December 2012

Festive Triple Peppermint Rocky Road


I know, I know, another Rocky Road recipe! but I just can't help myself! plus I made this for our games night the other week, alongside 4 other desserts and so it's always handy to have a no bake treat on hand when there's a lot of baking to be done! 


Of course I went overboard on the peppermint! How could I not when I had all these amazing goodies from the States I wanted to use up! I even had a bag of chocolate peppermint marshmallows too but I drew the line and decided the marshmallows should just be regular to balance out all the minty-ness! 
So I chopped up the white chocolate peppermint m&m's, the mint truffle Hershey's kisses and the candy cane Hershey's kisses, stirred in some rice krispies and mini marshmallows, drowned them all in some rich milk chocolate and refrigerate for an hour to form one tasty festive treat!


Festive Triple Peppermint Rocky Road:
Makes 16
From Cupcake Crazy Gem

450g milk chocolate (for eating, not baking)
1 tsp vegetable oil
1/2 cup candy cane kisses
1/2 cup mint truffle kisses
1/2 cup white chocolate peppermint m&m's
1 cup rice krispies
150g mini marshmallows

Melt the chocolate in a heatproof glass bowl, set above a pan of boiling water.  
Stir in the vegetable oil.
Chop the candy cane kisses, truffle kisses and m&m's in half.
Once the chocolate has cooled, add those into the bowl along with the rice krispies and mini marshmallows.  (I reserved back a handful of each ingredient to press into the surface of the Rocky Road to make it look pretty). 
Pour the mixture into your prepared tin.  If you want, press extra ingredients into the surface of the chocolate.

Put in the fridge for an hour until firm.  
Eat and enjoy!

Tuesday 11 December 2012

Lime, Coconut & White Chocolate Blondies

I made cake.


 Then I ate it.


Now I wish I had more.

While I went to the kitchen to stuff my face with coconut m&m's, I told my husband to export my photos for me that I was going to blog about.  He told me that he knows how to do a blog post, so I told him to go for it and just write the whole thing, when I returned he told me the post was finished! It was so great that I had to leave it as it is! There's nothing more I can add! 

Aside from the fact that I dreamt these Blondies up in one of those lightbulb moments, where I was deciding how I could bake my beloved white chocolate & coconut Lindt bar into something yummy.  Coconut & lime is one of my favourite flavour pairings so it seemed only natural that I should combine the two with my coconut Lindt chocolate! 

I know the blogosphere is awash with peppermint, egg nog and gingerbread recipes right now...but in my world you can and should eat coconut and lime every day of the week regardless of the season, especially when it's paired with white chocolate frosting and topped with grated lime zest and shredded coconut - delish!

Lime and Coconut Blondies:
Makes 12
From Cupcake Crazy Gem

225g White Coconut Lindt Chocolate
1/2 cup unsalted butter
1 cup caster sugar
3 large eggs
1/2 cup plain flour
1/4 cup desiccated coconut
2 tbsp lime juice
1 heaped tbsp lime zest

Preheat oven to 180 degrees C/350 degrees F.

Melt White Coconut Lindt Chocolate along with the butter in a heatproof bowl, set above a pan of simmering water.

Remove from heat once completely melted, and allow to cool.  Beat in caster sugar and eggs with a whisk.

Stir flour and coconut into the batter.  Add lime juice and grated lime zest.

Pour into prepared brownie pan (I made mine in a square pan) and bake for 20-25 minutes, or until an inserted knife comes out with just a few moist crumbs attached.

Leave to cool in pan whilst making this creamy white chocolate frosting:

1/2 cup unsalted butter
1 cup icing sugar
1/4 cup melted white chocolate chips

Melt white chocolate chips in a bowl in the microwave in 30 second intervals.
Beat unsalted butter and sifted icing sugar together.  
Once cooled, stir in the melted chocolate.  Continue beating for 3-5 minutes until the frosting is fluffy.

Spread generously on top of the Blondies, sprinkle with grated lime zest and handfuls of shredded coconut.

Eat and enjoy!

Tuesday 4 December 2012

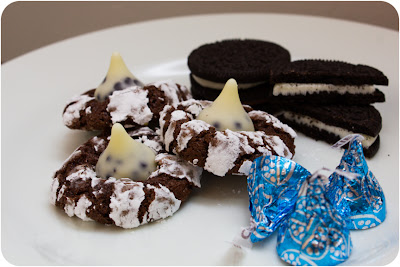
United Bakes of America Round 7 and Christmas Chocolate Crinkle Kiss Cookies!


Now that was a mouthful! I have been wanting to make crinkle cookies for so long, they seem so simple yet look so effective! and when I saw that Bakergirl had made some and put festive Hershey's Kisses on top I knew I had to make them a.s.a.p because I had a cupboard stuffed full of festive Kisses so it was the perfect match! 


You can really decorate them with any chocolate you like, for the caramel lovers Rolo's would be fun, for the peanut butter lovers mini Reese's Peanut Butter Cups would be super delish, but for mine I used 3 varieties of Hershey's Kisses: peppermint candy cane, mint truffle and cookies and cream.


They all turned out to be so yummy that I had a hard time to not devour them all in one evening! but my favourite of the bunch had to be the mint truffle kiss cookie! The cookies themselves are so rich and fudgy, and the addition of a flavoured kiss on top just sends them over the edge!


These would be the perfect cookie to make for your christmas cookie exchange, or to hand out as christmas gifts or to just have around the house for all those visitors you will be getting in the next few weeks!

Bake these up and your Christmas visitors will love you for it!


Christmas Chocolate Crinkle Kiss Cookies:
Makes 30
From Bakergirl

2 cups plain flour
1 cup unsweetened cocoa powder
2 tsp baking powder
1/2 tsp baking salt
2 cups caster sugar
1/2 cup vegetable oil
4 large eggs
1 tsp vanilla extract
1 cup icing sugar
Assorted Hershey's Kisses (I used peppermint, mint truffle and cookies and cream)

In a medium bowl, whisk together the flour, cocoa powder, baking powder and salt.

In a large bowl, whisk together the sugar, oil, eggs and vanilla extract.  Stir flour mixture into sugar mixture, until just combined.  Place plastic wrap over the bowl and refrigerate dough for at least 2 hours.  

Meanwhile, unwrap Hershey's Kisses, place in a small bowl and freeze until ready to use.

Preheat oven to 350 degrees F/180 degrees C.

Line a cookie sheet with parchment paper or foil; set aside.  Place icing sugar in a small bowl and set aside.

Scoop dough into 1/2 tablespoon balls (make sure you stick firmly to the 1/2 tablespoon...I thought that seemed like hardly any dough at all so I was more generous with my first batch and they turned out huge!), roll in the icing sugar, and place on baking sheet.  Bake for 11-13 minutes, until cookies crackle and no longer look raw (they'll start to look cakey).

Remove from oven.  Immediately press a frozen kiss into each cookie, then place cookie sheet into the freezer just until chocolate is set and is no longer shiny.  Remove from freezer and allow to cool completely on a wire rack.

...and there you have it! I dare you not to eat more than 5 in one go! 

Now, onto what other US inspired treats others have been baking! Ros from The More Than Occasional Baker made these absolutely adorable little Reese's Peanut Butter Cup Baked Buttermilk Mini Donuts! Not only do they have Reese's Peanut Butter Cups on top, but they also have vanilla pudding inside the donuts which is an ingredient you can only get in the States! Luckily, Ros thought to pick some up last time she was there 'just in case' and lucky she did! The recipe she used is also from a California blogger, Picky Palate, who happens to be one of my fave bloggers - in fact I forgot that I myself had recommended this recipe to Ros a few months back knowing the peanut butter loving fan she is! Glad she got a chance to try them...now I'm planning to try them myself too after these drool worthy pics! What's not to love about a light and fluffy buttermilk doughnut, dipped in ganache and covered in mighty chunks of peanut butter cup! 


My coconut loving blogging friend, Kit, from I-Lost in Austen made this beautiful Praline Bundt Cake after her husband brought her back a Bundt pan from his business trip to San Diego (lucky thing!). Apparently Bundt pans are hard to come by in France and so she was pretty pleased with her gift, I bet her husband was too after she baked this yummy sounding recipe! The bundt has chopped pecans and praline baked inside as well as cream cheese resulting in a super moist cake which I think is evident from the picture and as if that isn't delicious enough, it was then drizzled with praline icing! 


Finally, my sister Tamara baked up these Snickers Blondies using the Outsider Tart cookbook.  I am super jealous because I know exactly what these taste like, I tried one for myself back here and so I know just what I was missing out on by not living nearby enough to pop on over for a piece! They are baked like a brownie but packed with caramel, chocolate and peanut goodness and then drizzled with caramel and peanuts on top! If you live in London, you can try the real deal by picking one up from Outsider Tart themselves! You won't be sorry!


So I'm super excited to see what everyone bakes up this month, especially because it's December and as bakers we will all be in overload and I'm hoping lots of fun festive stuff will pop up! Be sure to enter UBA if it's an American inspired dish or uses American ingredients, because I love to see what you come up with!

Happy baking!

Friday 23 November 2012

7 Layer Bars


Remember I told you about our upcoming trip across the border, well it happened and it was amazing! I stocked up on tons of yummy ingredients and baking equipment...the week we got home I baked four things in one day for a little party we were having at our house, so I think it's safe to say my baking mojo has returned!

The first time I made magic bars was last Christmas and I was a convert straight away! Since we arrived in Canada I have made them 3 different times and they've disappeared so quick they've never made it to the photography stage!


What's not to love about a graham cracker crust with a soft moist layer of sweetened condensed milk on top, and layers of toasted coconut, milk choc chips, white choc chips, peanut butter chips and salted peanuts on top! Last time around I made them they weren't 'authentic' 7 layer bars as I had fewer than 7 ingredients so this time I made the real deal!

They are so easy to throw together and I loved the addition of peanuts this time around, it added a fun salty balance against all the sweet! 

These are the pefect bake to whip up for your friends and family with the holidays approaching, as they really don't take very much time and as long as you have a tin of condensed milk in your cupboard you can pretty much go crazy with whatever toppings take your fancy!


7 Layer Bars:
Makes 16
Adapted from Eagle Brand

1 1/2 cups graham cracker crumbs
1/2 cup unsalted butter, melted

1 (14 oz. can) sweetened condensed milk
1 cup semi sweet chocolate chips
1 cup white chocolate chips
1 cup peanut butter chips
1/2 cup peanuts
1 1/3 cups shredded coconut

Preheat oven to 180 degrees C/350 degrees F.
Grease a 13 x 9 inch baking pan.

Combine graham cracker crumbs and butter, mix well.  Press crumb mixture firmly into the bottom of the pan.  Pour sweetened condensed milk evenly over crumb mixture.  Layer evenly with remaining chocolate chips and peanuts.  Sprinkle the shredded coconut over everything.  Press down firmly with fork.

Bake 25-30 minutes or until lightly browned on top.
Leave to cool in pans.
Then cut into bars and transfer to cool completely on a wire rack.

Tuesday 13 November 2012

Pumpkin & Choc Chip Banana Bread


So I made these delicious little loaves back for Canadian Thanksgiving which was October 8th! It's taken me a while to get around to blogging about them because these pictures are not great! How I miss my collection of beautiful cake stands that are all packed away back in England in my parents attic! Instead I had to make do with a chopping board and our fall table runner from Wal Mart! Sad times! 


I was planning to be totally traditional and make a pumpkin pie but it's not my husbands favourite, when I gave him the choice of pie or me revamping one of his absolute faves - choc chip banana bread, it was no contest for him! 

Plus there doesn't seem to be enough banana bread variations on my blog just yet ;)

I also decided to bake mini versions because everything is more fun in mini form! The flavours worked really well together, it was super moist from the pureed pumpkin and the mashed banana, with just the right amount of spice coming through and when it was warmed up you had melting pools of chocolate too - delish! 

For all my American followers out there who are currently planning their Thanksgiving menu's, why not give this a try!


Pumpkin & Choc Chip Banana Bread:
Makes 4 mini loaves or 1 regular sized loaf
From Yummly

1 1/2 cups brown sugar (firmly packed)
3/4 cup softened unsalted butter
3 beaten large eggs
1 cup pumpkin (cooked or canned)
2 mashed bananas (ripe)
3 cups plain flour
2 tsp bicarbonate of soda/baking soda
1 1/2 tsp pumpkin pie spice
1/2 tsp baking powder
1/2 tsp salt
1/2 cup semi-sweet/dark chocolate chips

Preheat oven to 350 degrees F.

In a large bowl combine brown sugar, butter and eggs.  Mix until mixture is light and fluffy, approximately 1 to 2 minutes.  Add pumpkin and bananas, mix well, for another 2 minutes.  

Add remaining ingredients, except chocolate chips, mix until just moistened for another minute.  Stir in chocolate chips with a spoon.

Pour into four greased mini loaf pans, or one regular sized loaf pan.

Bake for 40-50 minutes or until a knife inserted comes out clean.  

Cool for 5 minutes and then remove from pans and transfer to a wire rack to cool completely.  

Serve warm with lashings of butter! It's the best way!

Speaking of pumpkin, I also made these cute little peanut butter filled pretzel pumpkins for a Halloween party we went too.  They won the prize for the best dessert of the night! but I forgot to take proper photos of them as I was in rush to get them finished and paint my nails with maple leaves for being a Canadian Hockey Fan! so you'll have to make do with this instagram pic! 


If you want to make some, you can follow Erica's recipe.  Instead of using chocolate chips to make my jack-o-lantern faces I just used an edible food marker.

Saturday 3 November 2012

United Bakes of America Round 6...and Reese's Peanut Butter Rocky Road!


Apparently Vancouver has somehow sucked away all my baking enthusiasm! I think it's because I had to leave my beloved baking cupboard contents back in England (my sister was the grateful recipient of all of that!) and so I no longer have an awesome baking cupboard brimming with ingredients and that makes me sad.  I'm also mourning the loss of my KitchenAid...again that was my sister's gain! and I'm mourning the fact that ingredients are SO expensive here! 

Hopefully though things are about to change around here...because tomorrow we're taking our first trip across the border to that favourite place of mine, the good old United States of America! and I could not be more excited! Firstly, because Canada doesn't get any of the speciality candy/baking ingredients I was expecting them to have and Secondly because KitchenAid hand blenders are waaay cheaper in the States and so I'm hoping one of them will work its way into my possession!  and hopefully a day spent in my favourite place stocking up on goodies will bring back my baking mojo! 


So until then I was way too lazy and sad this month to make anything that required more than a bowl and a fridge, but I did manage to spice up regular Rocky Road with not one peanut butter ingredient but four different peanut butter ingredients! (because we all know I can't do anything by half!)


Introducing...Reese's Peanut Butter Cups, Reese's Mini Sticks, Micro Mini Peanut Butter Cups and Reese's Peanut Butter Chips!

I was worried that it could just be a bit of a peanut butter overload! but as we all know North Americans love their peanut butter and I was actually making them for some firemen who we were going to visit with my local church group so I thought if anyone can handle a peanut butter overload it would be some big burly firefighters!

and actually we managed to sample a few at the end of the night and the marshmallows and rice krispies interacted with all that peanut butter-y goodness perfectly!


Reese's Peanut Butter Rocky Road:
Makes 12
Adapted from Cupcake Crazy Gem

450g milk chocolate for eating (so use your favourite brand)
2 tsp vegetable oil
1 cup rice krispies
150g chopped in half marshmallows
125g chopped up Reese's Mini Sticks
125g chopped up Reese's Peanut Butter Cups
40g micro mini Peanut Butter Cups
1/2 cup Reese's peanut butter chips

Melt the chocolate in a heatproof glass bowl, set above a pan of boiling water.  
Stir in the vegetable oil.
Chop the marshmallows, Reese's mini sticks and Reese's peanut butter cups into bite size pieces.
Once the chocolate has cooled, add those into the bowl along with the rice krispies and micro mini Peanut Butter Cups.  (I reserved back a handful of each ingredient to press into the surface of the Rocky Road to make it look pretty). 
Pour the mixture into your prepared tin.  If you want press extra ingredients into the surface of the chocolate.
Melt the Reese's peanut butter chips in the microwave, spoon them into a piping bag and drizzle diagonally both ways across the Rocky Road.
Put in the fridge for an hour until firm.  
Eat and enjoy! 

Now it's time for my favourite part, let's see what you have all been baking this month with American inspired ingredients!


Stuart from Cakey Boi kicked us off with this awesome Halloween Bark!  Not only is bark super American but to his melted chocolate he added pretzels, Oreos and Candy Corn! I'm not sure it gets more Yanky than that! I would have loved to have tried some myself, and I was won over by the super cute packaging too which was inspired by another American great - Martha herself!


Next up was Ros from the More than Occasional Baker who continued down the Halloween path with these delicious sounding Pumpkin Choc Chip Bars.  Not only did she use pumpkin puree, but her puree was actually brought over from the States in her suitcase from a previous trip there - dents and all, now that's dedication! She said that her kitchen smelt amazing whilst she baked it too, I'm not surprised - so if anyone wants a little more of that 'fall' feeling in their house maybe they should whip up a batch too! 


Laura of How To Cook Good Food must have been picking up on those same pumpkin themed vibes as Ros and she baked up this Spiced Pumpkin, Rum & Choc Chip Loaf, due to a squash explosion at her allotment! now that sounds like the kind of explosion I'd like to be a part of! 


Breaking away from the pumpkin theme, Kim of Cakes from Kim baked up these beasts using one of my all time favourite flavour combos - chocolate and mint! and not only that but she threw in some super special Mint M&M's (which I also happen to love) to create these Mint Chocolate Whoopie Pies. Speciality M&M's, Marshmallow Fluff, Whoopies - this bake couldn't be more American if it tried! Kim - you're lucky I'm no longer living in North Wales, I'm pretty sure I would have hunted down your house to try some of these! 


Finally, Caroline from Caroline Makes baked up these Nanaimo Bars, which are very dear to my heart right now being a pretty famous Canadian bake!  I have yet to try one here in the city because I'm saving myself for when I get to visit Vancouver Island to check out the town of Nanaimo itself and I plan to do the Nanaimo Bar trail! Until then I am left looking longingly at Caroline's delicious bars! and don't worry my geography skills haven't eluded me...although this is a Canadian treat Caroline made it using graham cracker crumbs which she bought at Wal Mart all the way over in Colorado! Man these jet setting Stateside blogging friends of mine are so lucky!


and not content with just whipping up one American bake, Caroline squeezed in this Chocolate Pumpkin Cheesecake too just before the deadline...and I decided why not allow multiple entries? As far as I'm concerned the more American inspired goodies the better! I love the swirly patterns and can just imagine how amazing it must have tasted! I have developed a huge love for all things pumpkin since crossing over the pond!

I cannot wait to see what everyone gets around to making next month! and am especially getting excited that we can now start counting down to festive fun and festive bakes!

Until next month, Happy Baking!

Monday 22 October 2012

Caramel Filled Curly Wurly & Rolo Cupcakes


Back in the summer when it was time to leave our temp jobs behind in Milton Keynes, we decided it would be fun to bake some cupcakes for the ladies at both the agencies who found us work to begin with.  I sent them emails asking them what their favourite chocolates were and the responses that came back were Curly Wurly's and Rolos! 


So I baked up these chocolate cupcakes, filled them with some caramel or 'carmel' as they say here in Canada! topped them with some caramel frosting which is super tooth achingly sweet which is why you only need a slither! and then topped them with their favourite chocolate bars!

I'd love to tell you the reason why I'm only blogging about them now is because I had planned this carefully and wanted to be blogging about them especially for National Caramel Month! but in fact I'm just playing catch up on my summers baking and it's a happy co incidence that October is National Caramel Month!


I tested out a new chocolate cake recipe as I'm always after finding 'the best' one there is! Jaclyn over at Cooking Classy described it as the unforgettable, perfect chocolate cake recipe and I would have to agree! It was really light and fluffy with the perfect amount of moistness, I'd encourage you all to bake up your own to see what all the fuss is about! 


Caramel Filled Chocolate Cupcakes with Caramel Frosting:
Makes 12
Adapted from Cooking Classy

1 cup plain flour
1/2 cup cocoa powder
1/2 tsp bicarbonate of soda
3/4 cup salted butter, firm but not cold
1 1/4 cups caster sugar
2 large eggs
1/2 cup buttermilk
2 tsp vanilla extract

Preheat oven to 180 degrees C.
In a mixing bowl, whisk together flour, cocoa powder and bicarbonate of soda.  Set aside.

In a separate large mixing bowl, using an electric hand mixer on medium-high speed, whip together butter and sugar until pale and fluffy for about 3-4 minutes.  Add in eggs one at a time, mixing after each addition until combined.  Measure out buttermilk in a liquid measuring cup and add vanilla extract to milk, then whisk to combine.  Working in 2 separate batches, add buttermilk mixture followed by flour mixture to butter mixture, mixing just unti combined after each addition (batter will be thick).  

Fill cupcake cases 2/3 full.  Bake in a preheated oven for 18-22 minutes, until a knife inserted into the middle of each cupcake comes out clean.  Allow to cool for 5 minutes in baking pan until transferring to a wire rack to cool completely.

I cut a hole in each cupcake with a knife and scooped out the cake, then filled it with some dulce de leche, and plugged it with a trimmed piece of cake.  

Frost with the recipe below, and finish them off with either a Rolo chopped in half or a piece or Curly Wurly or the chocolate of your choice! 

Caramel Frosting:

60g unsalted butter, at room temperature
6 tablespoons milk, at room temperature
220g light soft brown sugar
240g icing sugar, sifted
1/2 teaspoon good quality vanilla extract

Place the butter, milk and brown sugar in a heavy saucepan over a high heat and stir to combine.  Bring to the boil, stirring continuously, and allow it to boil for 1 minute.

Remove from the heat and stir in half of the icing sugar.  Leave the mixture to cool slightly, then add the remainder of the icing sugar and the vanilla extract and stir until it thickens to the desired consistency. 

The icing is best used immediately.  If you do need to make it in advance, thin it with a little double cream and beat well before using.  Alternatively heat the icing for 10 seconds in the microwave.

Eat and enjoy!

LinkWithin

Related Posts with Thumbnails